How to Create a Hard Drive Partition in Windows
Sometimes it is necessary to create a hard drive partition — for example, to install another operating system. In Windows, you can do this easily thanks to the tool that comes pre-installed with the system. In this brief tutorial, we’ll show you how to do it in just a few minutes.
Access Windows Administrative Tools
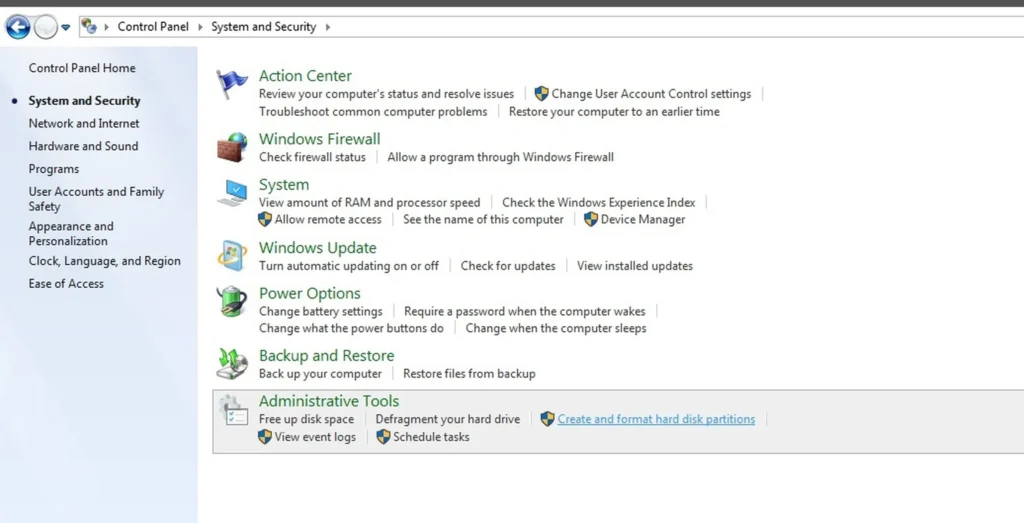
The first step to partition your hard drive in Windows is to access the tool designed for that purpose. It is built into the system, so you won’t need to install any additional software. Simply go to the Control Panel and click on Create and format hard disk partitions.
You can find it in the lower area of the screen. The image accompanying the first step of this partition creation tutorial shows exactly where it is. It is displayed in English, though the menu layout is similar in both Windows 7 and Windows 10.
Select the Drive You Want to Partition

A new window will then open. This is the disk management tool, where you can view all storage devices connected to your PC along with their respective partitions.
In our case, we can see the primary C: drive, on which Windows is installed, as well as another drive where we have installed a second operating system, and a USB drive.
Typically, if you only have Windows installed on your computer, you will need to select C: as the drive from which to create a partition. As a helpful reference: the Windows drive is always formatted as NTFS.
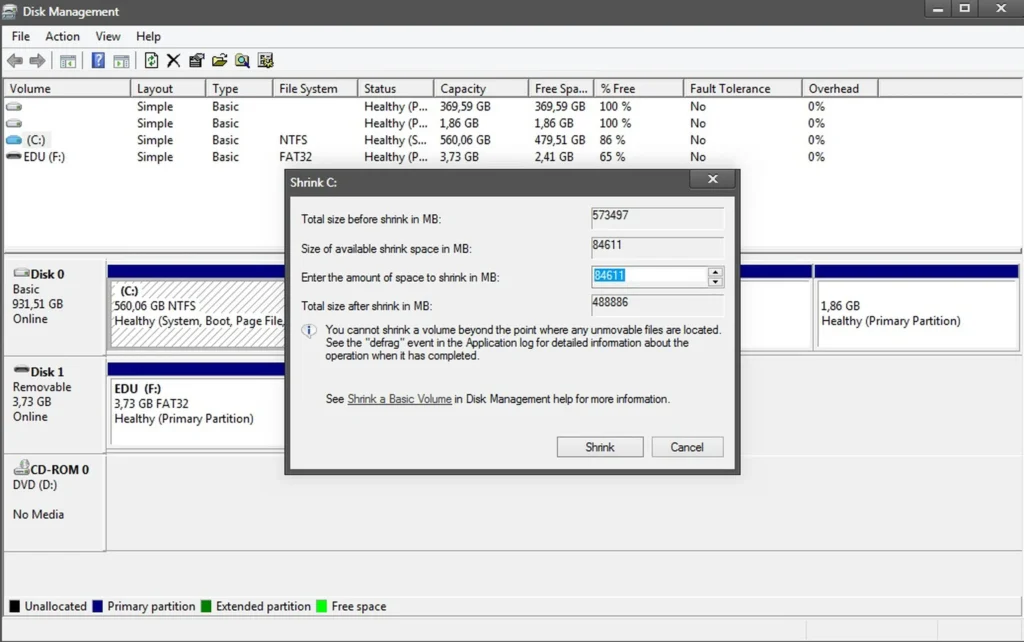
Shrink an Existing Partition to Make Room for a New One
Before a new partition can be created, you first need to free up space. The most common way to do this is by shrinking an existing partition.
Be careful here — it is not advisable to shrink the drive where Windows is installed too aggressively. Unless you have plenty of space to spare, try to avoid creating too many partitions on the same hard drive.
As a general rule, leave at least 400 GB for the Windows drive. It can work with less, but that is not recommended, as it may end up slowing down your PC’s performance.
To free up space and create a partition in Windows, right-click on drive C: — or whichever drive you have chosen — and select Shrink or its equivalent. A new window will open where you need to enter the amount of MB you want to free up.
For reference, the number shown at the top is the size of C: before partitioning. The number at the bottom shows what it will be after. As mentioned, try to keep the remaining size no lower than 400,000 MB.
Once you have made your decision, continue with the process and wait for it to complete. When it is done, your new partition will appear in green labeled as Free Space.
{“@context”:”https://schema.org”,”@type”:”HowTo”,”name”:”How to Create a Disk Partition in Windows”,”step”:[{“@type”:”HowToStep”,”position”:1,”name”:”Press Windows + X and select Disk Management”,”text”:”Press Windows + X and select Disk Management”},{“@type”:”HowToStep”,”position”:2,”name”:”Right-click the drive you want to partition”,”text”:”Right-click the drive you want to partition”},{“@type”:”HowToStep”,”position”:3,”name”:”Select Shrink Volume”,”text”:”Select Shrink Volume”},{“@type”:”HowToStep”,”position”:4,”name”:”Enter the size of the new partition in MB”,”text”:”Enter the size of the new partition in MB”},{“@type”:”HowToStep”,”position”:5,”name”:”Confirm and wait for unallocated space to appear”,”text”:”Confirm and wait for unallocated space to appear”},{“@type”:”HowToStep”,”position”:6,”name”:”Right-click the unallocated space”,”text”:”Right-click the unallocated space”},{“@type”:”HowToStep”,”position”:7,”name”:”Select New Simple Volume and follow the wizard”,”text”:”Select New Simple Volume and follow the wizard”}]}
A Few Things to Decide Before You Partition
Before touching anything, think about partition size. Windows itself needs about 30-40GB minimum, but a practical Windows partition for daily use should be at least 100GB — system updates, application installs, and temporary files add up faster than most people expect.
If you’re creating a second partition for data storage, make it as large as the remaining space allows. There’s no penalty for having a large data partition.
The Full Process, Step by Step
- Right-click the Start button and select “Disk Management”
- Right-click the drive you want to partition and select “Shrink Volume”
- Enter the amount to shrink in MB (e.g., 102400 for 100GB)
- Windows will calculate the maximum shrink amount — you can’t go beyond that
- After shrinking, you’ll see “Unallocated” space in the drive map
- Right-click the unallocated space and select “New Simple Volume”
- Follow the wizard — assign a drive letter and format as NTFS
The whole thing takes about five minutes and doesn’t require a restart.
When Disk Management Won’t Let You Shrink as Much as You Want
This is a common frustration. Windows places immovable system files (hibernation file, page file, system restore points) at various locations on the drive, which limits how much you can shrink. The fix: temporarily disable hibernation (powercfg /h off in Command Prompt as admin), disable the page file, clear restore points, then try shrinking again. You can re-enable them afterward.
Alternatively, a third-party tool like MiniTool Partition Wizard or GParted (from a Linux live USB) handles this more gracefully than Windows’ built-in tool.
Frequently Asked Questions
Will partitioning my drive erase my data?
No, shrinking an existing partition doesn’t erase data — it just reduces its maximum size. The data in the existing partition is untouched. Only creating or formatting a new partition where your data already lives would erase it.
Can I undo a partition after creating it?
Yes. You can delete a partition in Disk Management (right-click → Delete Volume) and then extend the adjacent partition to reclaim the space. The data on the deleted partition will be lost, but the rest of the drive is unaffected.
Should I use MBR or GPT for my partition scheme?
GPT is the modern standard and required for drives larger than 2TB and for UEFI boot. New drives should use GPT. If your drive is already formatted as MBR, you’ll need a third-party tool to convert it without losing data.
How many partitions can a drive have?
On GPT drives, up to 128 partitions. On MBR drives, up to 4 primary partitions (or 3 primary + 1 extended containing logical partitions). In practice, 2-3 partitions covers every real use case.
Does having multiple partitions slow down my drive?
No for SSDs. On traditional HDDs, having data spread across a physically fragmented partition can have minor performance implications, but it’s negligible in most real-world scenarios.