
How to Install Linux on a Windows Computer
If you want to know how you can run the Linux operating system within Windows, you’ve come to the right place — we’re going to walk you through it.
To install Linux on Windows, we’ll need to use a service that can be installed directly within Microsoft’s own operating system, allowing us to run a Linux distribution sharing the same system space.
Read also: How to Block Websites on Windows 11 (Complete Guide)
For Linux enthusiasts, this is great news — you no longer need to create disk partitions to get Linux running alongside Windows, nor do you need to set up virtual machines.
The key is to take full advantage of the compatibility Windows offers with Linux through the Windows Subsystem for Linux, or WSL. Let’s skip the preamble and get straight into what it is and how to install it.
What is WSL?
Looking at Microsoft’s own definition of the Windows Subsystem for Linux makes its purpose perfectly clear.
«The Windows Subsystem for Linux (WSL) lets developers install a Linux distribution (such as Ubuntu, OpenSUSE, Kali, Debian, Arch Linux, and more) and use Linux Bash command-line tools, utilities, and applications directly on Windows, unmodified, without the overhead of a traditional virtual machine or a dual-boot setup.»
These tools allow you to switch between distros via the Microsoft Store and run common command-line utilities with ease.
Requirements for WSL
There’s nothing complicated here — the only requirements relate to the operating system versions that support WSL.
You should be running Windows 10 version 2004 or later (Build 19041 or higher), or Windows 11, to use the commands below. If you have an older version, refer to the manual installation page.
Installing WSL (Installing Linux on Windows)
WSL can be installed with a single command, making the process as straightforward as it gets.
Just follow these steps:
- Open PowerShell or the Windows Command Prompt in Administrator mode by right-clicking and selecting Run as administrator.
- Once inside, simply run the command wsl –install
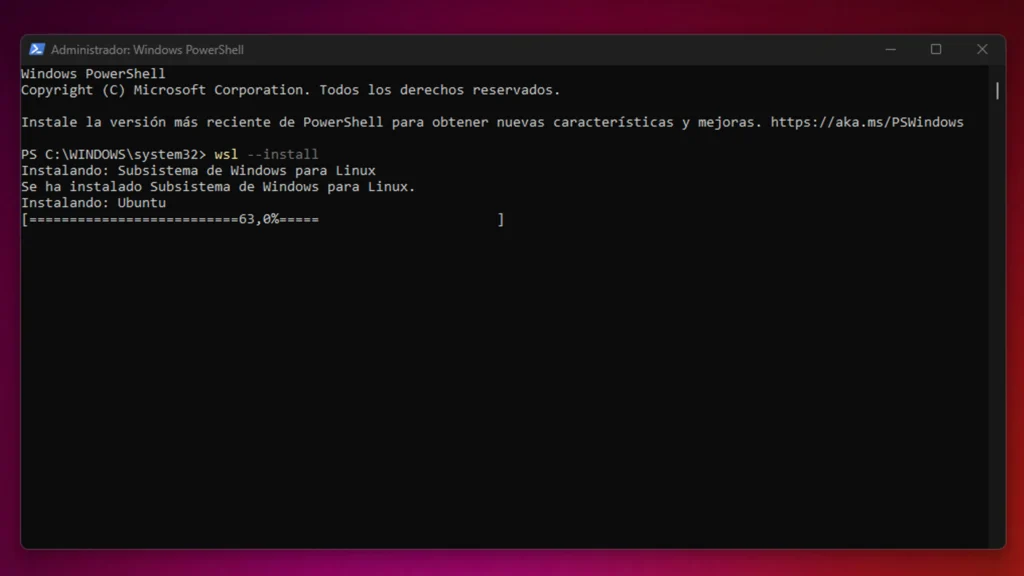
- Once everything has loaded and installed, restart your computer for the changes to take effect.
- This command will enable the features required to run WSL and install the Ubuntu Linux distribution. (This default distribution can be changed.)
WSL Configuration
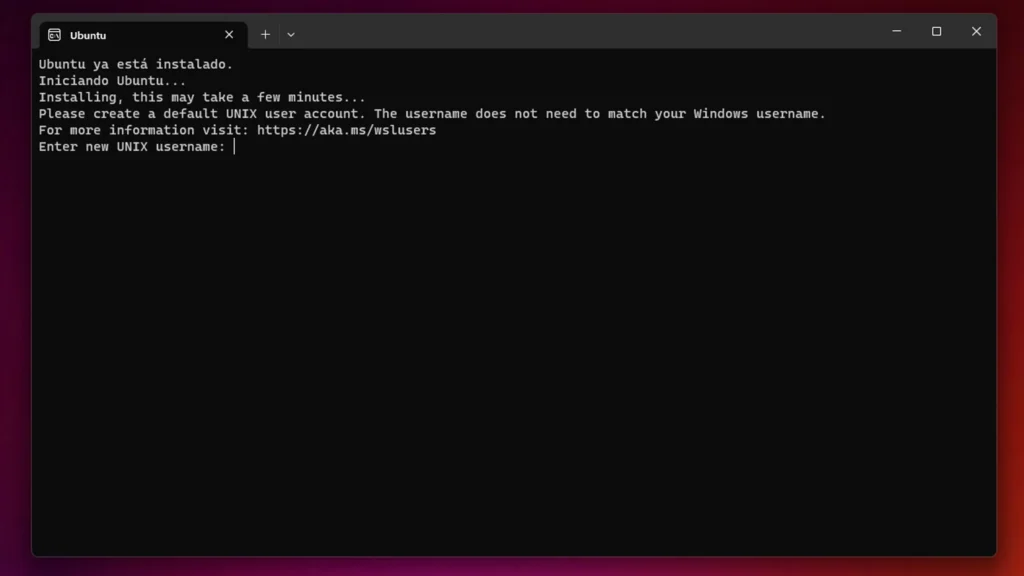
The first time you launch a newly installed Linux distribution, a console window will open and you’ll be asked to wait while the files are decompressed and stored on your machine. All subsequent launches should take less than a second.
You will also be prompted at the start to set up a username and password before you can begin working with Ubuntu.
If you want to switch to a Linux distribution other than Ubuntu, you can do that too.
To see a list of Linux distributions available to download through the online store, type: wsl –list –online
You can install Linux on Windows with other distros such as:
- Kali Linux
- Debian GNU/Linux
- Fedora Remix for WSL
- Pengwin
- Alpine WSL
- OpenSUSE Leap
To switch the installed distribution, simply enter: wsl –install -d <Distribution Name>.
Remember to replace <Distribution Name> with the name of the distribution you want to install.
WSL Version
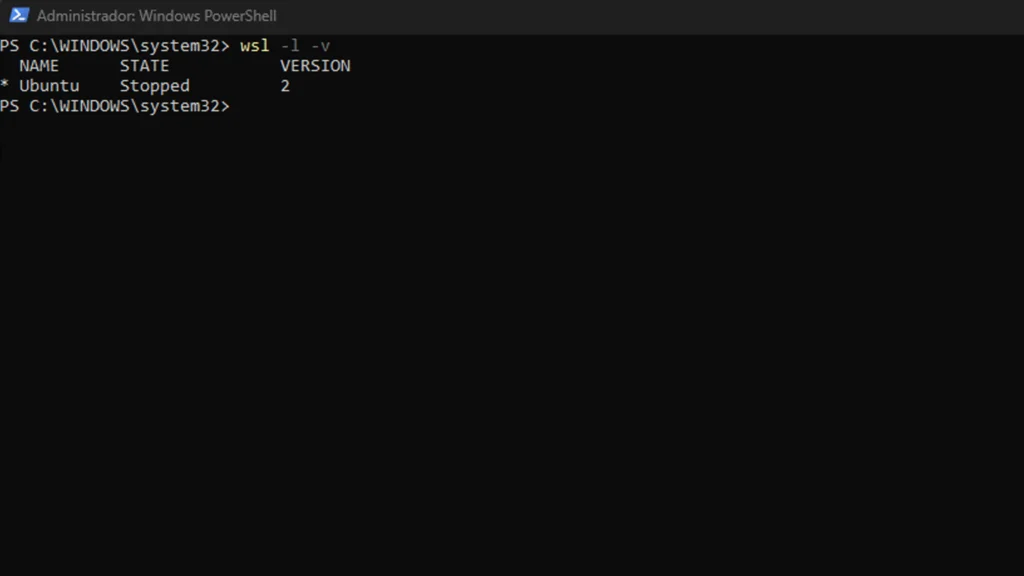
There are currently two versions of WSL: WSL 1 and WSL 2. The second is more modern and faster, so it’s worth upgrading if your machine is still running the first version.
The first thing to do is check which version of WSL is installed on your computer. To verify this, run the command: wsl -l -v in PowerShell or the Windows Command Prompt running as Administrator.
To change the WSL version, use the command wsl –set-version <distro name> 2, replacing <distro name> with the name of the Linux distribution you want to upgrade.
A good example would be: wsl –set-version Ubuntu-20.04 2, which will configure the Ubuntu 20.04 distribution to use WSL 2.
This is currently the simplest way to install Linux on Windows and have the full Linux operating system available to you directly from Microsoft’s platform.
{“@context”:”https://schema.org”,”@type”:”HowTo”,”name”:”How to Install Linux on Windows”,”step”:[{“@type”:”HowToStep”,”position”:1,”name”:”Open Windows Settings”,”text”:”Open Windows Settings”},{“@type”:”HowToStep”,”position”:2,”name”:”Go to System > Optional Features > More Windows Features”,”text”:”Go to System > Optional Features > More Windows Features”},{“@type”:”HowToStep”,”position”:3,”name”:”Enable Windows Subsystem for Linux (WSL)”,”text”:”Enable Windows Subsystem for Linux (WSL)”},{“@type”:”HowToStep”,”position”:4,”name”:”Restart your computer”,”text”:”Restart your computer”},{“@type”:”HowToStep”,”position”:5,”name”:”Open Microsoft Store and search for your Linux distro”,”text”:”Open Microsoft Store and search for your Linux distro”},{“@type”:”HowToStep”,”position”:6,”name”:”Install Ubuntu or your preferred distribution”,”text”:”Install Ubuntu or your preferred distribution”},{“@type”:”HowToStep”,”position”:7,”name”:”Launch the distro and create your user account”,”text”:”Launch the distro and create your user account”}]}
Preguntas Frecuentes
What is WSL?
Looking at Microsoft’s own definition of the Windows Subsystem for Linux makes its purpose perfectly clear.
Requirements for WSL
There’s nothing complicated here — the only requirements relate to the operating system versions that support WSL.
Installing WSL (Installing Linux on Windows)
WSL can be installed with a single command, making the process as straightforward as it gets.
WSL Configuration
The first time you launch a newly installed Linux distribution, a console window will open and you’ll be asked to wait while the files are decompressed and stored on your machine.
WSL Version
There are currently two versions of WSL: WSL 1 and WSL 2.