Windows 11 and Linux on the Same PC
As technology advances, the need for versatile and adaptable tools keeps growing, especially for day-to-day work. That is why installing two operating systems on a single computer has become a practical option for many users.
This is where dual booting plays an important role — it is a feature that lets you choose between different operating systems when you power on your machine. This way, you can take full advantage of the strengths of each one for a comfortable and efficient experience.
Read also: Windows 11 vs Windows 10: Is It Worth Upgrading in 2026?
Windows 11, with its intuitive interface and compatibility with a wide range of software, is ideal for everyday tasks, office productivity, and entertainment. Linux, on the other hand, with its focus on stability, security, and customization, provides an ideal environment for programming, web development, and tasks that demand higher performance — including activities that involve working with artificial intelligence.
While it may seem like a complex process at first glance, there is actually a straightforward way to install Windows 11 and Linux to run them side by side. That said, it is recommended to have a basic understanding of both operating systems to avoid difficulties during the process.
Requirements for Setting Up a Windows 11 and Linux Dual Boot
Before you begin, it is crucial to make a backup, as installing the new operating system may involve formatting the hard drive. In addition, you must meet the following minimum requirements:
- 64 GB of available storage.
- 4 GB of RAM (64-bit).
- A 8 GB USB drive (or 2 USB drives if you do not already have Windows 11).
Once you meet these requirements, the next step is to download the ISO images of the operating systems you want to install. For example, if you already have Linux, you can download a Windows 11 ISO from the official Microsoft website.
Conversely, if you already have Windows, you should look for a GNU/Linux distribution. There are many available, though the most recommended and user-friendly options are Ubuntu, Debian, and Linux Mint.
How to Create a Bootable USB Drive for Windows 11 and Linux
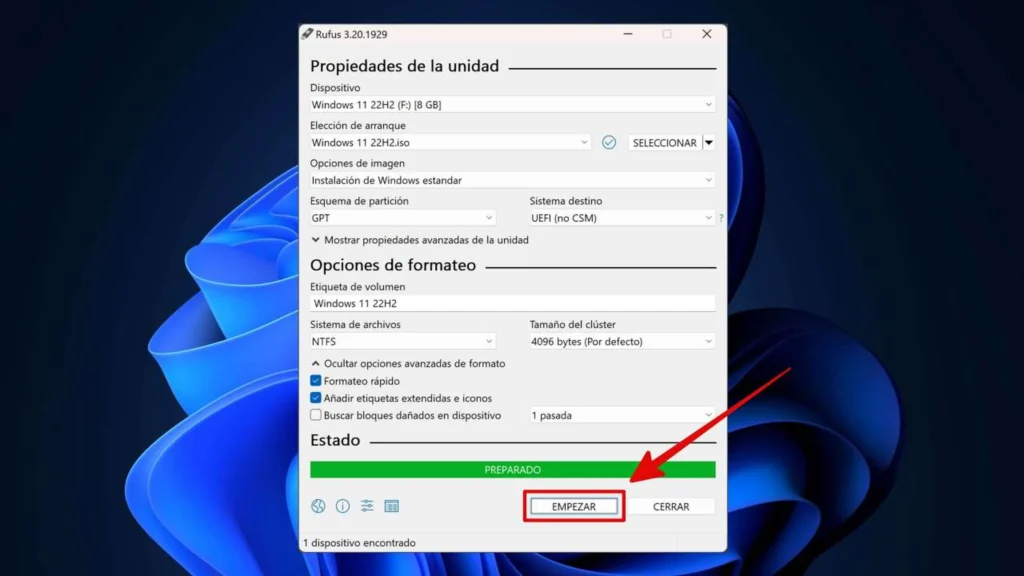
Now that you have the ISO files, you need to prepare the USB drives to create the bootable media. To do this, you can use tools such as Rufus or Etcher. In this guide, I will walk you through the method using Rufus, although the process is essentially the same with other options. Follow these steps:
- From your computer, go to the official Rufus website and navigate to the Latest Releases section.
- Download the latest available version and run the rufus.exe file.

- Plug the USB into your PC and, in the Rufus application, verify that it appears under the Device section. If it does not, restart Rufus.
- Next, click the Select button on the right side and browse to the ISO image of the operating system you downloaded earlier.
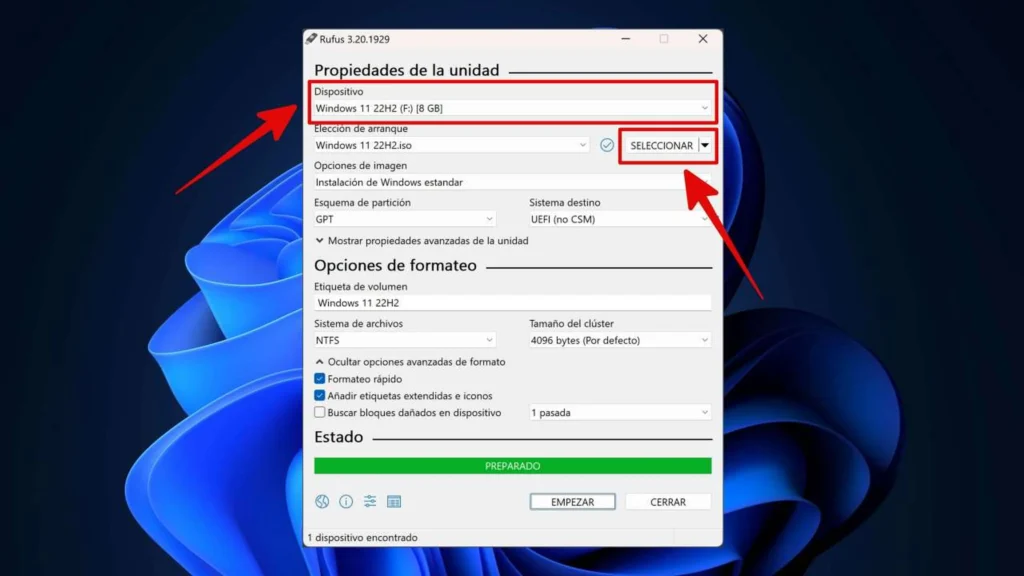
- Click the Start button to continue the process. A window will appear offering two options for creating your bootable USB. It is best to leave it set to Write in ISO Image Mode (Recommended) and click OK.
- If the program asks you to format the USB drive, confirm by clicking the OK button.

Regarding the Windows 11 bootable USB, you only need to create it if you do not yet have this operating system installed on your computer. In that case, the process differs slightly, but it is similar to Rufus. Here is what you need to do:
- Go to the official Microsoft website and under the Create Windows 11 Installation Media section, click the Download Now button. This will download the Media Creation Tool.
- Once downloaded, run the program as administrator.
- In the License Terms dialog, click Accept.

- Change the language if necessary and make sure the Edition field shows Windows 11. Then click Next.

- Plug in your USB drive and select the USB Flash Drive option to continue.

- From here, simply follow the on-screen instructions and wait for the USB drive to be ready.
Keep in mind that if you already have Windows 11 on your PC, you can skip this step entirely and will not need an additional USB drive.
Disable Secure Boot in Windows
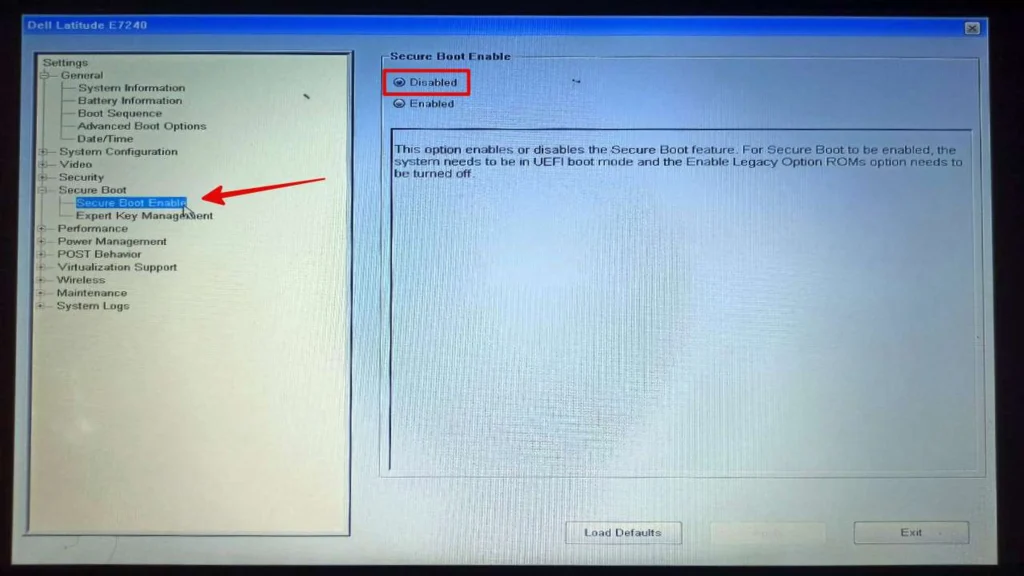
In Windows, you need to disable Secure Boot to prevent issues with the system’s boot process. While the interface may vary depending on your computer model, the procedure is always the same. Follow these steps:
- Restart your computer and access the UEFI. You can do this by holding down the key shown on the screen during system startup, which is typically F2, F10, or Del.
- Go to the Security section and under Secure Boot, change the option from Enable to Disable.
- Save your changes by pressing the Save or Exit button.
How to Configure the Dual Boot on Windows 11 and Linux
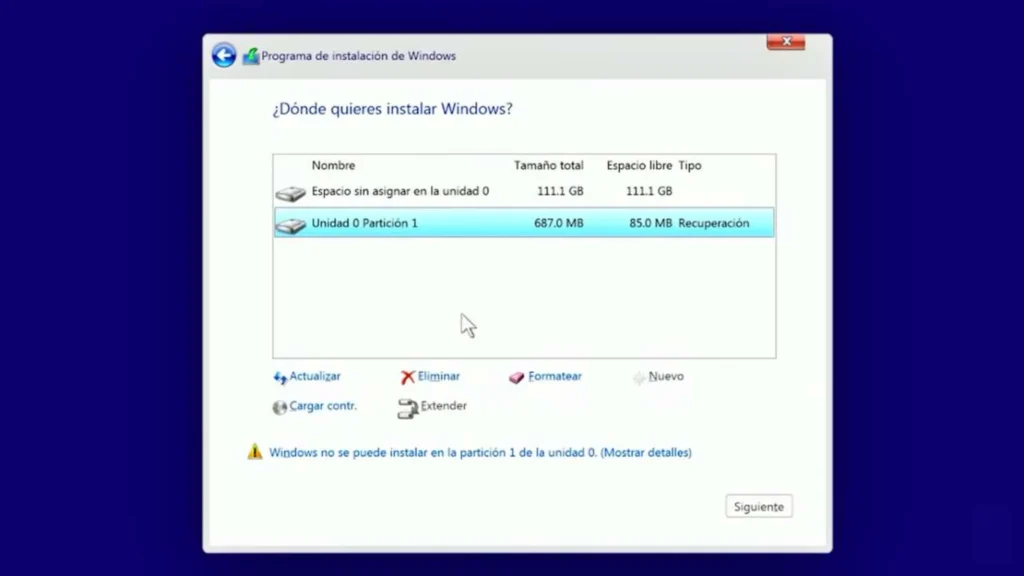
After disabling Secure Boot, you need to create partitions for the dual-boot operating systems on the hard drive. The easiest method is to install Windows 11 on your PC first, so you simply need to connect the USB drive and restart the system to follow the on-screen instructions.
The idea is to choose the Custom Installation option to create a partition for Windows 11. In this case, you will need two partitions and you should assign the storage size according to your preferences.
It is important to note that this cannot be changed afterward, as it will be fixed in the system. Therefore, make sure everything looks correct, then click Next to continue with the process.
When the installation finishes, restart your computer and proceed with installing Linux. If you need to free up space on the hard drive to accommodate this OS, follow these steps:
- Press the Windows button and search for the Create and Format Hard Disk Partitions application.
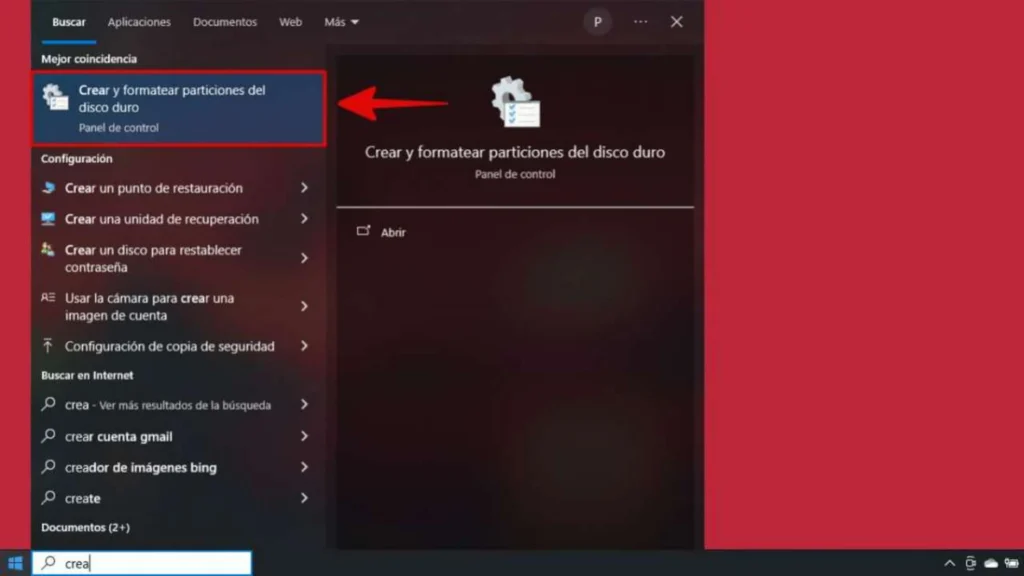
- When it opens, the Disk Management tool will appear. Right-click on the hard drive where you want to install Linux — in this case, the Windows 11 drive.
- Click Shrink Volume and wait for a new window to open. In this section, simply enter the amount of MB you want to reduce from the disk to allocate space for the other operating system.

Let us move on to installing Linux. I will walk you through the process using the Ubuntu distribution, but if you have chosen a different one, there is no need to worry — the steps are similar and you can follow the instructions provided by the installer you selected. Continue as follows:
- Plug in the bootable USB with the Linux distribution you installed and restart your PC.
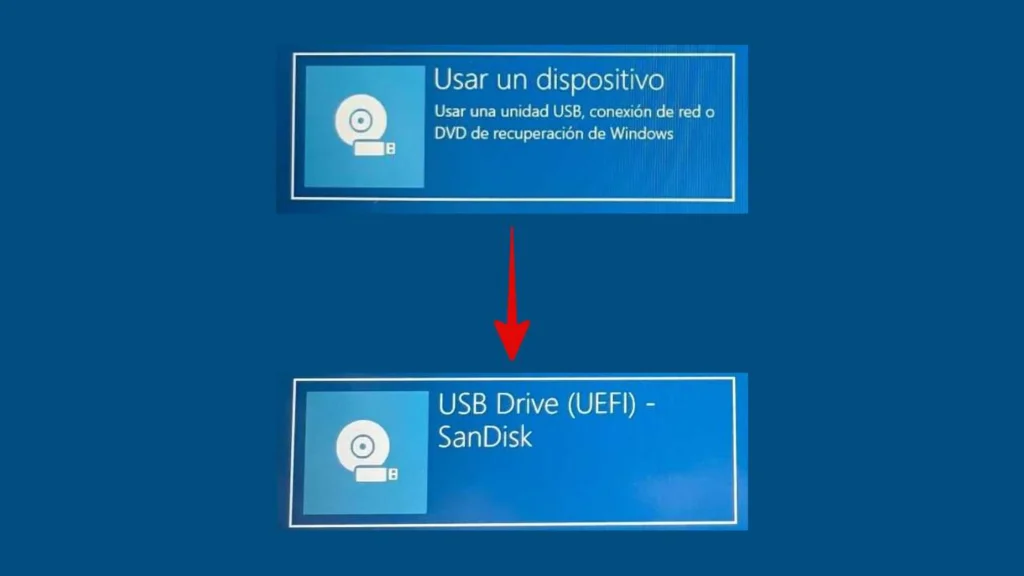
- When the system boots, you will see a screen with many options. Select Use a Device and then choose USB Drive (UEFI).
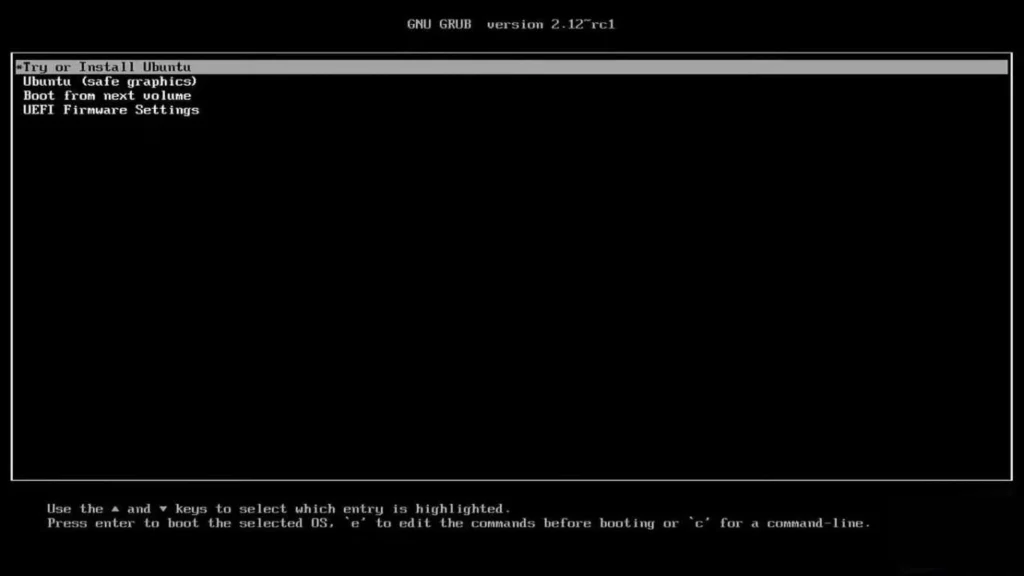
- This selection will take you to a new screen where you should click Try or Install Ubuntu to launch the software installer.
- Select the installer language.
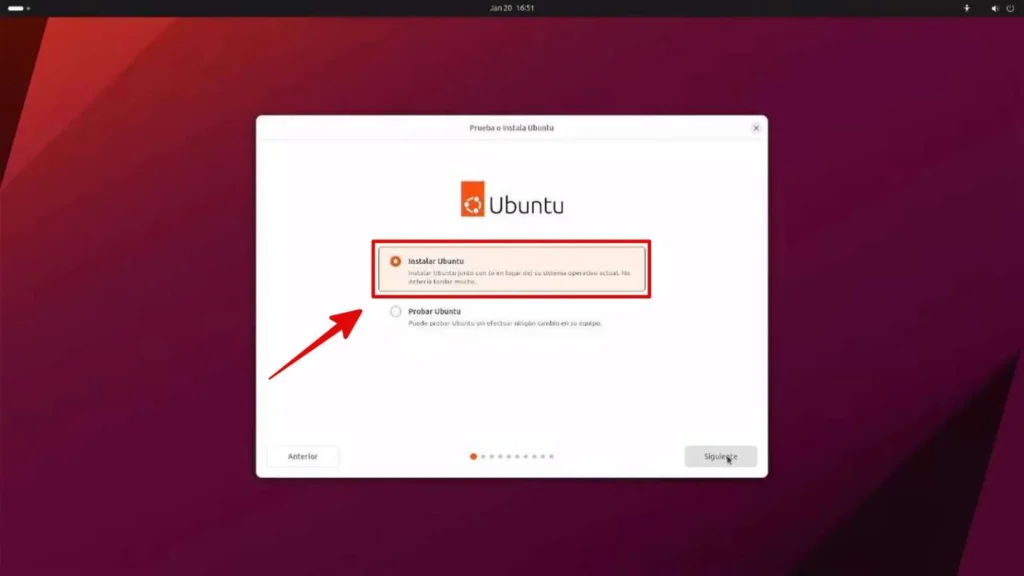
- Then click Install Ubuntu and then Next.
- Choose the language you want for the Linux distribution.
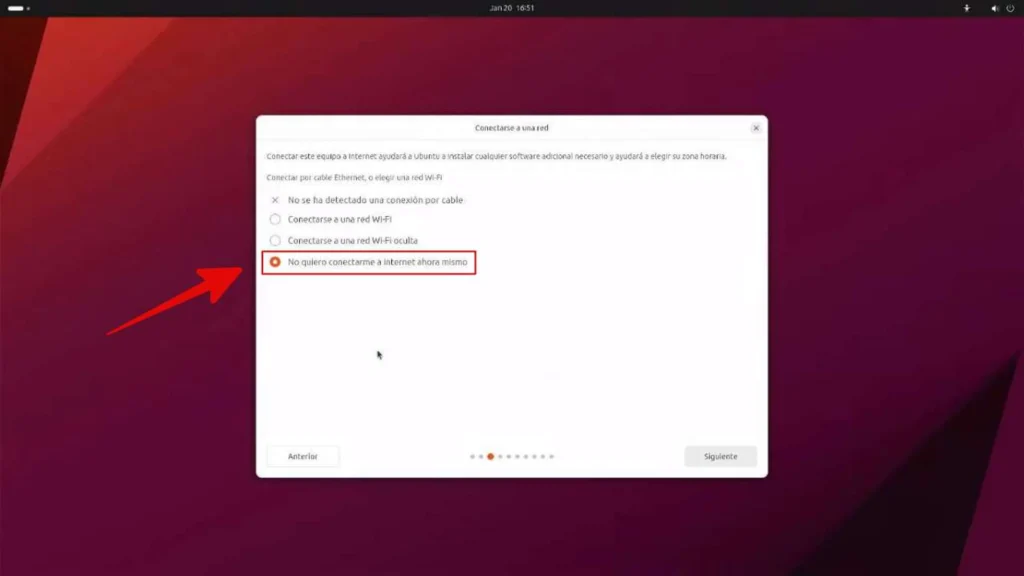
- Connect to a network if needed, or click I Don’t Want to Connect to the Internet Right Now.
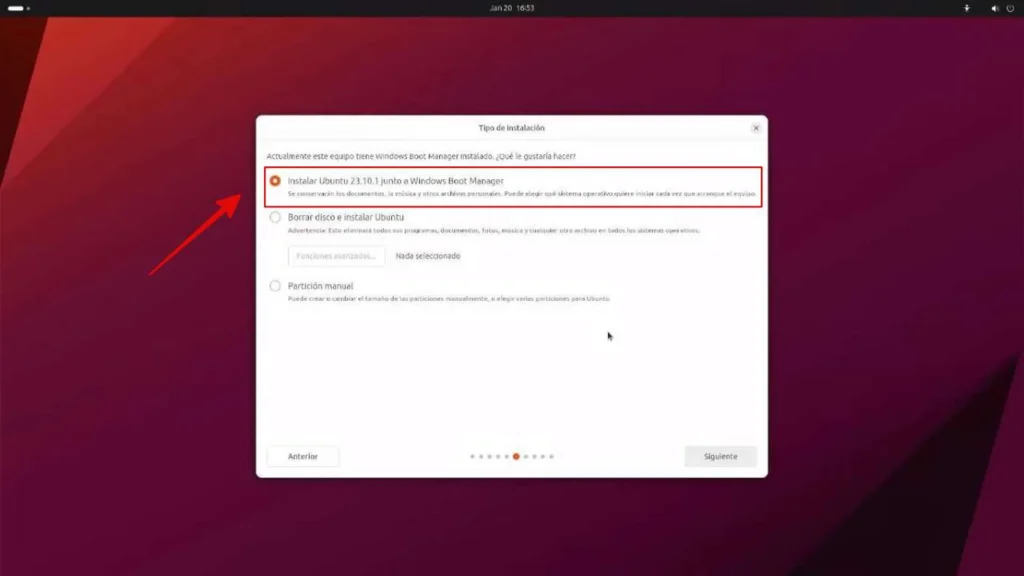
- Now click Default Installation and continue by clicking Next. A new section will appear where you should select Install Ubuntu alongside Windows Boot Manager.
- Next, you will find a section that lets you adjust the storage space allocated to each operating system. You can set this by dragging the slider in the middle between the two icons.

- Once you have finished specifying the storage allocation for Windows 11 and Linux, the corresponding partitions that will be modified are displayed. If you are satisfied, click Install — otherwise, go back one step and adjust the parameters.
- Once you proceed, set your time zone.
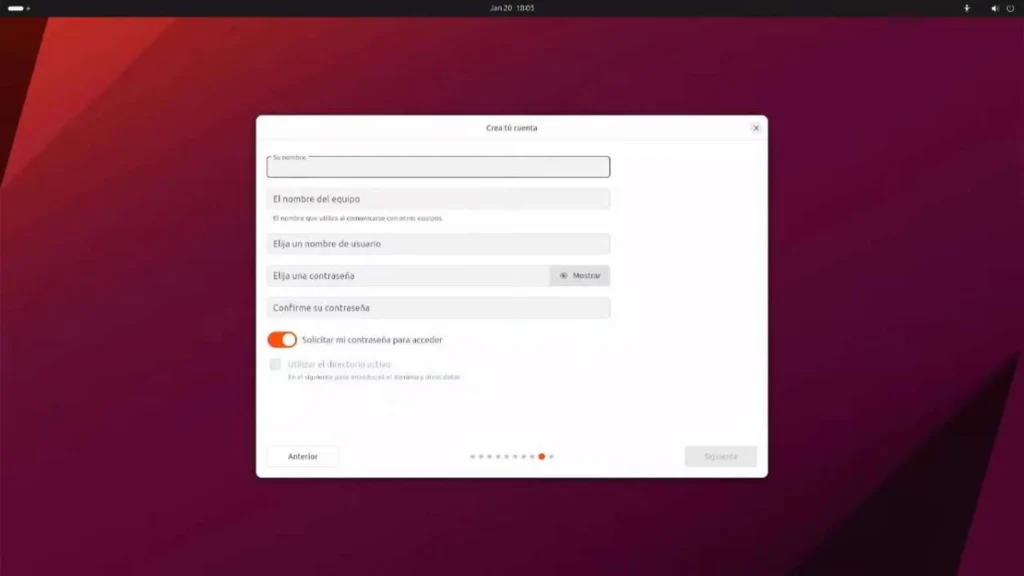
Then create an account with the requested details and select a personalization theme.
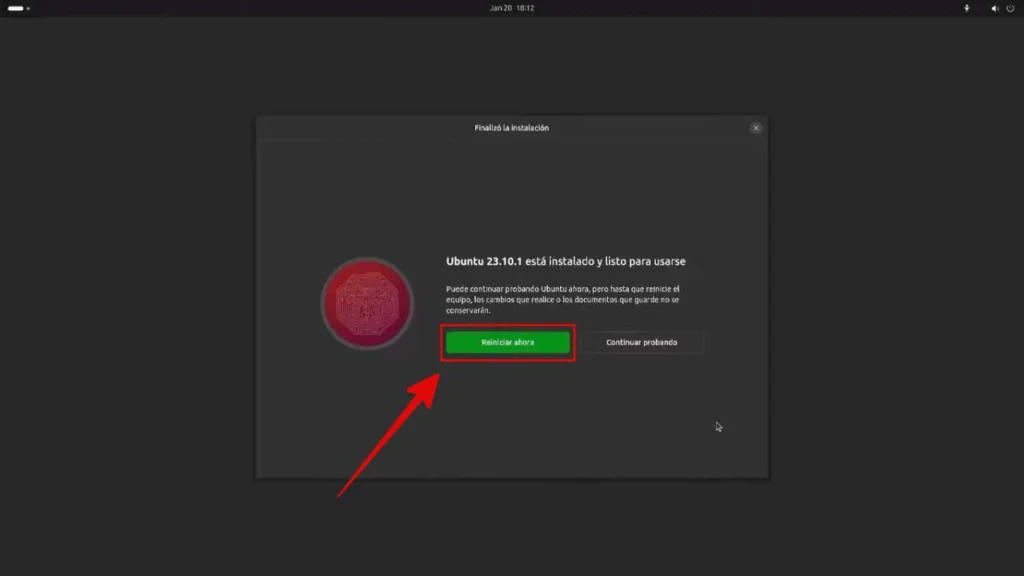
- From this point, you need to wait for the installation to complete and then click the Restart Now button.
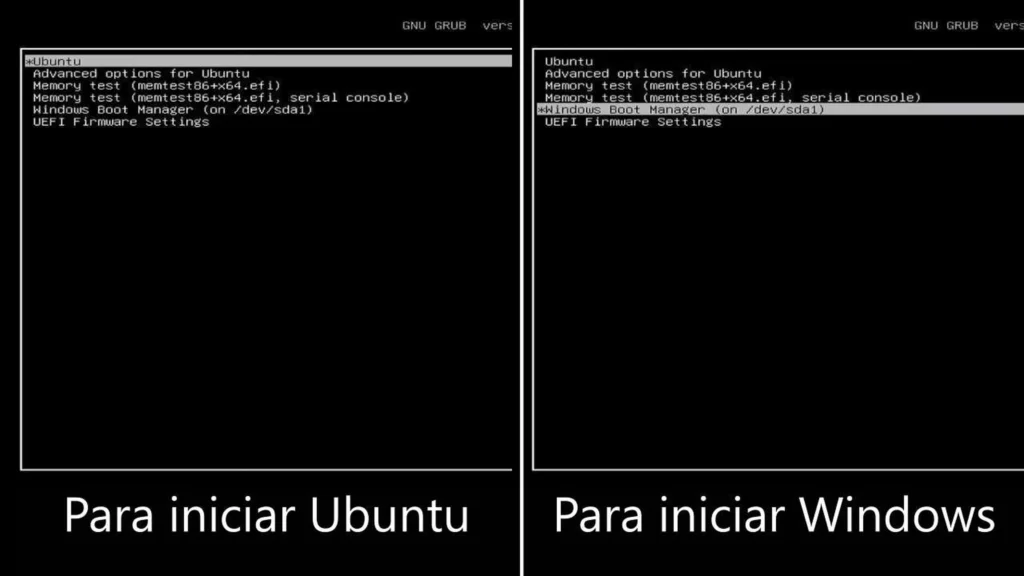
- When you turn on your computer, you should now be able to manually select the operating system you want to boot into. You can navigate this list using the arrow keys and confirm your selection with Enter.
Once both systems are installed, take some time to customize Windows 11 and Linux to your liking. Adjust the settings, install the applications you need, and explore the different features each one has to offer.
Preguntas Frecuentes
Requirements for Setting Up a Windows 11 and Linux Dual Boot
Before you begin, it is crucial to make a backup, as installing the new operating system may involve formatting the hard drive.
How to Create a Bootable USB Drive for Windows 11 and Linux
Now that you have the ISO files, you need to prepare the USB drives to create the bootable media.
How to Configure the Dual Boot on Windows 11 and Linux
After disabling Secure Boot, you need to create partitions for the dual-boot operating systems on the hard drive.