Rescuezilla, a Tool That Simplifies System Backup and Restore

Rescuezilla is a tool and Ubuntu-based Linux distribution that simplifies the backup, cloning, and restoration of operating system images, and can also verify existing ones. Its main purpose is to make the tools provided by Clonezilla more accessible — tools that are powerful but can be difficult and rough to use for less experienced users. That is where Rescuezilla comes in, aiming to ease things by providing a simple graphical interface that brings Clonezilla’s capabilities closer to commercial solutions like Acronis True Image and Macrium Reflect.
Rescuezilla was born as a fork of Redo Backup and Recovery, can be booted from a USB drive on x86-based PCs and Macs (Intel and AMD), and has been «carefully developed» to be fully interoperable with Clonezilla — meaning Rescuezilla can restore backups made with Clonezilla and vice versa.
Read also: How to Update Drivers on Windows 11
Focusing on the present, Rescuezilla 2.5 was recently released with the primary goal of improving hardware support, and as such has added Ubuntu 24.04 LTS, Ubuntu 23.10, and Ubuntu 23.04-based images, complementing the already existing Ubuntu 18.04 LTS, Ubuntu 20.04 LTS, and Ubuntu 22.04 LTS images. In addition to the system images based on various Ubuntu versions, a Deb package providing the tool has also been included.
The second major new feature in Rescuezilla 2.5 is the introduction of an experimental command-line interface (CLI) that currently only supports images created with Clonezilla and Rescuezilla, and covers backup, verification, restore, and cloning operations. The developers emphasize that the CLI is in an unstable phase, so its use in production environments is not recommended.
The partclone tool has been updated from version 0.3.20 to 0.3.27, Rescuezilla itself has been integrated into the automated integration test suite scripts to allow faster iteration with the project, and it is now possible to continue scanning images after an error, so a permission-denied error encountered in irrelevant folders will no longer block the image listing.
There is more: a bug that caused RAID device backups to fail via the Linux md driver when they contained MBR partition tables has been fixed; the hashdeep package is now installed as a temporary command-line workaround for a specific niche of users until Rescuezilla’s interface handles it properly; bugs in restore and cloning operations that appeared when Rescuezilla 2.4.2 was used in Portuguese have been corrected; and laptops are now prevented from entering sleep mode when the lid is closed.
Those are the main highlights of Rescuezilla 2.5. Anyone who wants the full details can find them in the release announcement published on the project’s GitHub repository, where the ISO images and the Deb package are also available for download.
How to Create a Bootable Rescuezilla Drive
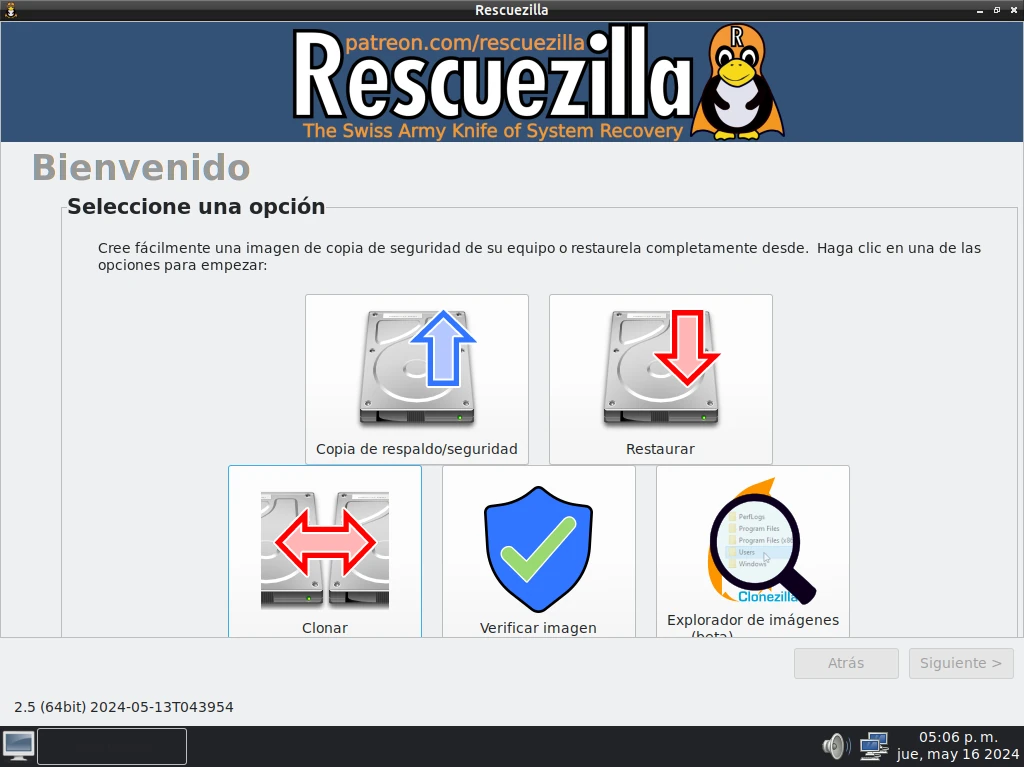
Rescuezilla is distributed as an ISO file. Download it from the official website, then flash it to a USB drive with Rufus or balenaEtcher. Boot from that USB on the machine you want to back up — it’ll load a desktop environment where everything happens.
The interface is straightforward enough that you won’t need documentation for basic tasks. The main screen gives you five options: Image, Restore, Verify, Clone, and a few extras. For most people, it’s Image (to back up) and Restore (to recover).
Creating a Full System Backup
Select “Image,” choose the drive you want to back up (typically your C: drive), then choose a destination — an external hard drive, a network share, or another internal drive. Rescuezilla creates a compressed image file, so a 100GB Windows installation might compress down to 40-50GB depending on how full the drive is.
The backup runs faster than you’d expect. A 200GB drive with Windows and a handful of apps typically takes 20-40 minutes over USB 3.0.
Restoring from a Backup
Boot from the Rescuezilla USB again, select “Restore,” point it to your backup image, and choose the target drive. It’ll warn you that everything on the target will be overwritten — that’s expected. The restore process is just as fast as the backup.
This works across different hardware too. If your motherboard dies and you get a replacement, you can restore the image to the new setup. It won’t always be perfect — drivers may need updating — but you’ll at least have your data and applications intact.
How It Compares to Windows Backup
Windows’ built-in backup has improved over the years, but it still has quirks — particularly around restoring to dissimilar hardware. Rescuezilla is more reliable for bare-metal restores and handles edge cases better. It also doesn’t require Windows to be running, which matters when Windows itself is the problem.
Frequently Asked Questions
Can Rescuezilla back up drives with Windows 11?
Yes. Rescuezilla works at the block level, so it doesn’t care what operating system is on the drive. Windows 11, 10, Linux — it handles all of them.
Do I need to install Rescuezilla on my computer?
No. It runs from a USB drive without installation. Your existing system stays untouched while you’re using it.
Can I restore a Rescuezilla backup to a different hard drive?
Yes, even a smaller one — as long as the target drive has enough space for the actual data. Rescuezilla handles partition resizing during the restore.
Is Rescuezilla compatible with Clonezilla backups?
Yes, that’s one of its main features. Rescuezilla can open and restore images created with Clonezilla, making it a more accessible front-end for the same backups.
What file systems does Rescuezilla support?
It supports NTFS, FAT32, exFAT, ext2/3/4, Btrfs, and several others. In practice, if you’re backing up Windows or Linux drives, you’re covered.